Something not working? Skip to Troubleshooting.
What you need
- Laptop
- 64-bit Windows 10 or 11.
- Robot code
- An FTC project in Android Studio, on FTC SDK 10.3 or newer.
- adb
- Android's tool for talking to the robot. Android Studio brings it.
- Java
- Version 17 to 22, to build your code. Android Studio can bring it, if its Java is in that range.
- Robot
- A Control Hub, on USB-C or Wi-Fi.
- AI tools
- Node 24 or newer. Nothing else in Swervely needs it.
Blocks and OnBot Java aren't supported, because the library installs through Gradle. You need the Android Studio project.
To look around first, the laptop is enough. The simulator is built into the app.
How it finds adb and Java
For adb it looks in ANDROID_HOME, then ANDROID_SDK_ROOT, then where Android Studio puts it (%LOCALAPPDATA%\Android\Sdk), then your PATH.
For Java it takes the newest version from 17 to 22 out of JAVA_HOME, the Microsoft, Eclipse Adoptium, Java, Zulu and Amazon Corretto folders in Program Files, and Android Studio's own Java. A new Android Studio can bring a Java newer than 22, which doesn't count. If that's you, install JDK 21 and Swervely finds it.
Settings, Tools shows what it found, and you can set either one by hand there.
Install
Get the installer from the download page and run it. It installs just for you, so it never asks for an admin password. If Microsoft WebView2 isn't on the laptop yet, it asks to download that first, which needs internet.
Recordings, saved logs and files from the robot go in Documents\Swervely.
Mac (alpha)
The Mac version is on the download page and needs macOS 12 or newer. M1 and newer Macs take Apple silicon, older ones take Intel. If something breaks, email swentze@proton.me.
macOS blocks it the first time because it isn't signed by Apple yet. Drag it to Applications and open it once, then go to System Settings, Privacy and Security, scroll down and press Open Anyway.
On a Mac, saved files go in ~/Documents/Swervely, and Cmd works along with Ctrl for the shortcuts.
Add the library
The library runs inside the robot app, and it's what Swervely talks to. It takes the place of FTC Dashboard, with the same classes and no browser page, so code that uses FtcDashboard, TelemetryPacket and @Config keeps working. The hardware and odometry checks come with it.
With the button
- Press Set up Swervely in the "Not connected" strip. That opens the setup steps in Settings, Robot code. If you hid them, Show the setup steps on that page brings them back.
- Pick your robot code folder, the one with
gradlewandTeamCodein it. - Press Add the library. You see every changed line, and nothing is written until you press Change the file. A copy of the old file is kept.
- Deploy, which the next section covers.
It looks for build.dependencies.gradle at the top of the folder, then in TeamCode. It adds only what's missing, removes an old FTC Dashboard line and moves an older library version up. A newer version stays as it is. With no such file, it says so and gives you the lines to copy.
By hand
Paste these lines into build.dependencies.gradle, next to your TeamCode folder, and delete any old FTC Dashboard line. The exclude line stops Road Runner and other libraries from bringing it back. Then deploy.
repositories {
maven { url 'https://swervely.vercel.app/maven' }
}
configurations.all {
exclude group: 'com.acmerobotics.dashboard'
}
dependencies {
implementation 'com.nomadicdragons.swervely:Once it's on the robot, the Robot Controller's status line says "Swervely: waiting for the laptop" or "Swervely: laptop connected", and its menu can turn Swervely off and on.
Deploy
Deploy builds your code and installs it on the robot. Press Deploy at the top, or F5 on any page. It asks first, because a running OpMode stops and the robot app restarts. Swervely reconnects by itself afterwards. With no folder picked yet, it asks for that first.
Gradle's output shows on Control Hub, Deploy code. The first build of the day can take a few minutes. It runs gradlew :TeamCode:installDebug, and Settings, Tools can change that.
If the build works but adb can't install it, which is common over Wi-Fi, Swervely sends it through the Control Hub's web page instead. The robot app then restarts in about 45 seconds.
Connect
While nothing is connected, a strip across the top of the app asks how:
- USB cable goes into the Control Hub's USB-C port. It has to be a data cable, and plenty of cables only charge.
- Wi-Fi: join the robot's network on the laptop first, then press it. Swervely looks at
192.168.43.1unless you change that in Settings, Connection. It also triesadb connect, so the robot log, files and deploy can work over Wi-Fi too. - Simulator is a pretend robot inside the app, with nothing else to set up.
- Other address takes a
host:portyou type.
The top right shows Linked, Searching or Offline. If a cable gets pulled or the robot app restarts, Swervely keeps trying by itself. Next time you open it, it reconnects over USB or Wi-Fi the way you did last time, and Settings, Connection can turn that off.
When it can't connect, the strip says what it thinks is wrong. Troubleshooting goes through each message.
Try the simulator
Press Try it without a robot in the "Not connected" strip while the setup steps are up, or find it with Ctrl K. It connects the simulator and opens a small card in the corner with five steps. Show me opens the page for each one.
- Drive. Press Drive at the top right. W A S D move, the arrow keys turn, Esc stops.
- Change a value. On Tuning, set
FLStrengthto 0.7, which makes the front left wheel 30% weaker. Drive again and hold W, and the robot slides a little to the right. - Find that wheel. The hardware check spins each wheel on its own and says which one is slow.
- Run a path. Click the field on Paths to draw one, press Run on robot, then Start at the top.
- Go on to your own robot. The last step opens the setup steps.
None of this touches a real robot. Tuning values you change on the simulator stay until you set them back or close Swervely. A plain Simulator button skips the tour.
The simulated robot is 18 by 18 inches, with mecanum wheels and its own SimTeleOp. Its path follower is a simple one, so it tests your path and the app, not your Pedro tuning.
The deck
The deck is the strip under the page tabs, on every page. It works like the Driver Hub.
- An OpMode is a program on the robot. A TeleOp is one you drive, and an autonomous drives by itself. Pick one from the list.
- Init runs the OpMode's setup, and then it waits.
- Start makes it run.
- Stop ends it.
Next to the buttons you get what the robot is doing (Idle, Ready, Running with a clock, or Stopping), the battery voltage and how many telemetry packets arrive each second. If your OpMode adds robot buttons with FtcDashboard's addAction(name, code), they show here too.
Driving from the laptop
Press Drive at the top right, or Ctrl D. If nothing is running it starts the OpMode picked in the deck, or else your first TeleOp. It never starts an autonomous or one of the checks. On a real robot it asks the first time after each connect, then goes straight in.
With no gamepad plugged in, the keyboard drives: W A S D move and the arrow keys turn. While driving, the window gets a striped frame. Esc stops. It also stops by itself if you click another window, the connection drops or the gamepad is unplugged.
Getting around
Ctrl 1 to Ctrl 6 switch between Live, Tuning, Checks, Paths, Recordings and Control Hub. Ctrl K finds any page, action, tuning value or telemetry number.
Live
Live is where you watch the robot. Every pane is a panel you can move.
X47.10-34.19in
Y-40.4233.59in
Heading180.0-137.6deg
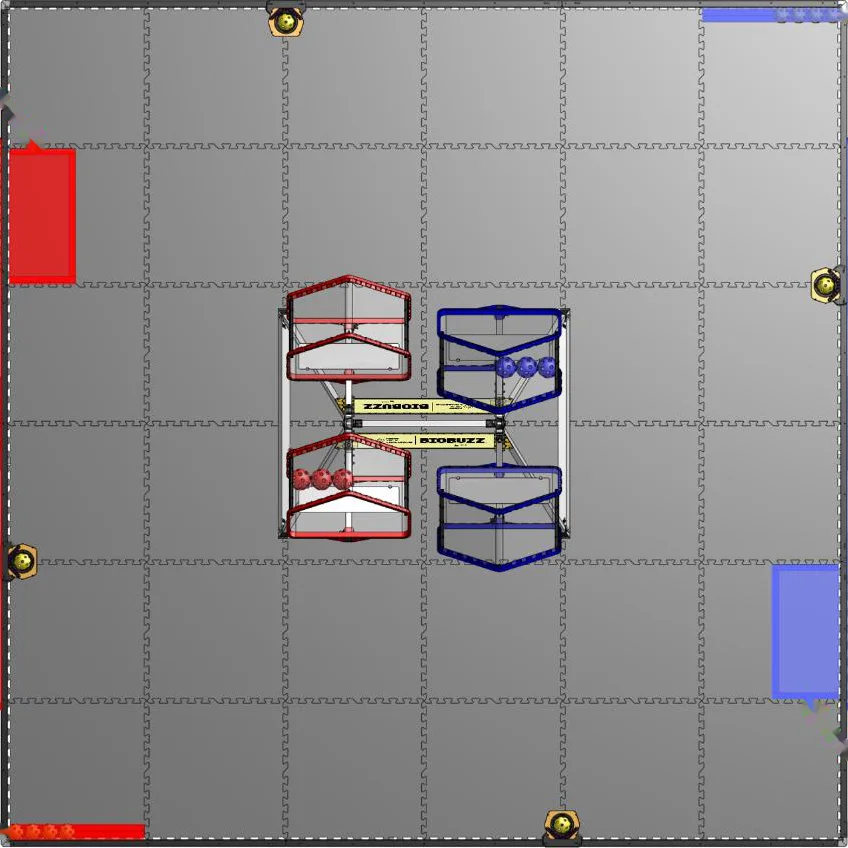
- Field shows the robot, whatever your OpMode draws, and where the robot drove in the last 15 seconds. Hover to read coordinates and click to copy them. Scroll to zoom, and double-click to see the whole field again.
- Graph plots any number. Pause it, drag across it to zoom, and copy what's on screen as CSV.
- Telemetry lists the latest value of every number. Tick a row to put it on the graph.
- OpMode log keeps your OpMode's log lines. Events is a timeline of the session: Init, Start, Stop, errors, a low battery, driving and recordings.
- Tuning, Heading step and Gamepad can be panels here too.
Drag a panel by its tab to move it, split the space or stack it with another. A panel can float, fill the page, or pop out to a second screen. The Window menu at the top right opens and closes panels, and switches between the Standard, Driving, Tuning, Graphs and Logs workspaces. You can save your own there, and lock the layout for a competition.
For the field and big numbers to show your robot, your OpMode has to send its position, in inches from the middle of the field and degrees. You can change the names in Settings, Telemetry names.
TelemetryPacket packet = new TelemetryPacket();
packet.put("X", robotX);
packet.put("Y", robotY);
packet.put("Heading", robotHeading);
FtcDashboard.getInstance()
    .sendTelemetryPacket(packet);
Tuning
Tuning lists every public static field in a class marked @Config. Change a value and press Save to robot. It stays until the robot app restarts, so save good values to your code. An orange dot on the tab means an edit isn't saved yet. If a value saves but does nothing, your code may be using hot reload.
@Config
public class TuningValues {
    public static double DrivePower = 0.5;
}Save to code
Once you've saved a value to the robot, it shows in a box called Changed this session. Save to code in that box finds each value's line in your robot code folder and shows you every line it would change. Nothing is written until you say so, only the value changes, and a copy of the old file is kept. Then it offers Deploy, because the values only stay on the robot after a deploy.
It leaves a value out and says why if the value is nested in an object, comes from a library, is in a Kotlin file, or has no matching line or more than one. Copy as Java gives you the lines to paste by hand. The simulator doesn't have the button, since its values aren't in your code.
Heading step test
If your OpMode has a robot button for it (called Heading step unless you rename it in Settings), Run step presses it, records the turn and scores overshoot, rise time, settle time and steady error. The last 10 runs stay on this laptop with the gains they used, so you can try a gain, run, and compare.
Checks
Three tools for looking the robot over before a match. Each keeps its last 20 runs on this laptop. On a real robot, each one asks first.
Hardware
Put the robot on blocks, tick the box and press Run the check. SwervelyCheck spins each wheel on its own, then gives every motor, the battery, the Pinpoint and the loop time a pass, warning or fail with the reason. A wheel 10% off the median speed gets a warning, and 15% off is a fail.
It finds the wheels by their names in your robot config, like fl, frontLeft or leftFront. For other names, set DriveMotors in the SwervelyCheck group on Tuning to the four names: front left, front right, back left, back right.
Odometry
For a goBILDA Pinpoint. SwervelyOdometry watches while you move the robot by hand, and it never powers the motors. There are four steps: keep it still, push it forward about 24 inches along a tape line, push it left about 24 inches, and turn it counterclockwise in place. The results say whether each pod counts the right way, whether the pods look swapped or crooked, and how far the pose moved against the tape.
Once both pods count the right way it suggests offsets. Apply to robot saves them, Redo the turn checks them, and Copy as Java gives you the values for your code.
Drive tests
The robot drives a few short moves by itself and measures each one, so clear about 1 m around it. The moves are forward and back, strafing, the four diagonals and spinning in place. The results say in plain words if a wheel pair is weak, or if it twists or slides off line.
It needs a running OpMode that sends X, Y and Heading and drives from gamepad 1. Unplug the gamepad from the Driver Hub first, or the robot ignores the laptop. A fence stops it if it gets 10 inches from where it started, sticks only go to 35%, and Esc stops it. Those are the defaults, and Settings, Safety changes them.
Paths
Paths is for drawing an autonomous for Pedro Pathing, in Pedro's coordinates. Paths are saved on this laptop only. Copy JSON and Paste JSON move one to another laptop.
Segment 320.6 in
HeadingLinearConstantTangentFaces along the path as it bends.
Ready to send.Driving segment 1 of 3: Segment 1.Driving segment 2 of 3: Segment 2.Driving segment 3 of 3: Segment 3.
- Drag the green outline to move the start, and its round handle to turn it.
- Click the field to add a segment. Add control point bends it into a curve.
- Choose a segment and pick its heading: Linear, Constant or Tangent.
- Play drives the robot's outline along the path, so you can see where it turns.
- Mirror for other alliance adds a copy flipped left to right.
- Copy as Java copies a whole autonomous OpMode for Pedro Pathing 3.0.1.
Run on robot
Run on robot sends the path to the robot and does Init on the path runner. On a real robot it asks first and says where to put the robot. Start makes it drive, and the field shows where the robot really is. Stop path brakes it where it is.
Add to my code
A real robot needs the path runner in your code. When your code doesn't have it, Add to my code in the Run on robot panel writes SwervelyPathRunner and SwervelyPaths into a swervely folder in TeamCode. You see every line first, and a file already there is left alone. Then deploy.
It needs Pedro Pathing set up, with a Constants.java that has createFollower, and it needs the library. The files are written for Pedro Pathing 3.0.1, so an older Pedro may not build them. If you renamed the runner in Settings, there's no button and you add it by hand.
Recordings
Record at the top right saves every telemetry packet to Documents\Swervely\recordings, as a .jsonl file and a .csv you can open in Excel or Google Sheets.
Replay on the Recordings page plays one back into the field and graph, with pause, speed and a timeline. Delete asks first, then removes both files.
Control Hub
The Robot log and Files need adb, so connect with the USB cable, or over Wi-Fi with adb working.
- Robot log is Android's log from the hub, with a filter box and a level picker. Save writes the lines you can see to
Documents\Swervely\logs, so you can send a crash to a mentor. - Files browses
/sdcard/FIRSTon the hub, and downloads go toDocuments\Swervely\hub-files. - Deploy code shows the build as it goes. Save output keeps a failed build's output.
AI tools
The AI panel is a chat with an assistant you already have on the laptop: Claude Code, Codex, Gemini CLI, Copilot CLI or opencode (Cursor Agent runs in the Terminal tab). Swervely doesn't come with one, and the panel links to where you can get them. Assistants need internet and the robot's Wi-Fi usually has none, so use the USB cable if you want both.
To use the Swervely tools in another app, open Settings, AI tools and press Install next to it. That works for Claude Code, Claude Desktop, Codex, Copilot CLI, Cursor, Gemini CLI, VS Code, Windsurf and Zed. Any other app that speaks MCP gets the same thing with Copy config.
The tools refuse to move the real robot, write its tuning values or deploy code until the assistant says you agreed. In Settings, AI tools, Simulator only means it never can.
Ask AI
Ask AI shows on the Robot log, after a failed build and on the red robot error strip. It puts the crash or build error in the AI panel's message box with a plain question. Nothing goes to your assistant until you press send.
Updates
About 10 seconds after it opens, at most once a day, Swervely asks GitHub for the newest version number. If there's a newer one you get one message with a Download button. Run the new installer over the old one, and it asks to close Swervely if it's open. Nothing installs by itself.
Settings, Privacy has the switch for this, the version you have and Check now.
The library has its own version. A real robot with an older one gets an orange strip that says so. Update it changes the Gradle file the same way Add the library does, and you deploy after that.
Troubleshooting
The first few are the messages the connect strip shows while it keeps trying.
"The robot app is not answering"
This is normal for about 20 seconds, since a robot app restarting after a deploy takes that long. Check the robot is on and the Robot Controller app is running. After about 10 tries Swervely looks closer, and on USB or Wi-Fi the line usually turns into one of the ones below.
"The Swervely library probably isn't on the robot yet"
The robot app runs, but nothing answers on the port the library uses. The strip offers Add the library, or Deploy if your code already has it. If the Robot Controller's status line says "Swervely: switched off", turn it back on with Enable Swervely in its menu.
"The robot app isn't running"
The robot is plugged in, but the app isn't up. Restart the robot, or open the app if your robot uses a phone.
"Could not start adb"
Swervely can't find adb. Install Android Studio, which brings it, or set the path in Settings, Tools. The strip has an Open Settings button.
"The robot is plugged in but has not allowed USB debugging yet"
Reconnect the cable. A phone asks on its own screen, so check there if your robot uses one.
"No robot found by adb"
Usually this is a charge-only cable. They look the same as data cables, so try another one. Check it's in the Control Hub's USB-C port and the robot is on. Or connect over Wi-Fi.
"Can't reach the robot"
The laptop probably isn't on the robot's Wi-Fi. Join that network and check the robot is on. If the robot's address isn't 192.168.43.1, change it in Settings, Connection.
The build fails, or says "No Java 17 to 22 found"
The first line of a deploy says which Java it builds with. It needs 17 to 22. Install JDK 21 or set the JDK folder in Settings, Tools, which also says if a folder you picked is the wrong version. After a failed build, Ask AI can hand the error to your assistant.
Driving from the laptop does nothing
The robot only listens to the laptop when no gamepad is assigned on the Driver Hub, so unplug the gamepad there. Your OpMode also has to drive from gamepad 1. Laptop driving only listens while Swervely's main window is in front.
A saved value does nothing
If your code loads OpModes through Sloth or Sinister, a value can read back right on Tuning while the OpMode keeps the old one. Pedro Pathing's tuning library brings Sloth in by itself. When Swervely finds one of these in your Gradle files, the note at the top of Tuning names it.
Confirm a change in telemetry before you trust it. If it doesn't take, use Save to code and deploy.
A page is empty on a real robot
When a page is stuck because of your code, it says what to add, usually with a Copy button. Tuning needs a @Config class of your own. Telemetry, the field and Drive tests need your OpMode to send X, Y and Heading. Checks need the library. Under the deck, you get a small TeleOp to copy when the robot lists only Swervely's checks.
Still stuck
Email swentze@proton.me and someone on the team will write back. It helps to attach the file from Save on the Robot log or Save output on a failed build. Both go in Documents\Swervely\logs.